
Performing a Full Bust Adjustment (FBA) or a Small Bust Adjustment (SBA) on a garment can be intimidating. Throw a French Dart into the mix and it can feel downright paralyzing!
Have no fear! Adjusting your French Darted pattern to fit your unique and beautiful shape is relatively simple and utilizes many of the same techniques as working on a normal FBA/SBA.
Before diving in, I wanted to note that I will not be going over how to determine whether you need an FBA or SBA, or how to figure out the math on how much to adjust your pattern by. I already have an extensive blog post on that HERE that you can totally check out if you have never performed either of these alterations on your patterns before.
Instead, this post will be fully dedicated to the act of making your alterations on a French Dart specific pattern. This process can be used for any pattern with a French Dart, but I will be using the Mathilde Wrap Dress as an example below.
Let’s Get Started
Regardless of whether you are performing an SBA or an FBA, the following steps will all be the same! I will let you know once we divert into SBA or FBA territory.
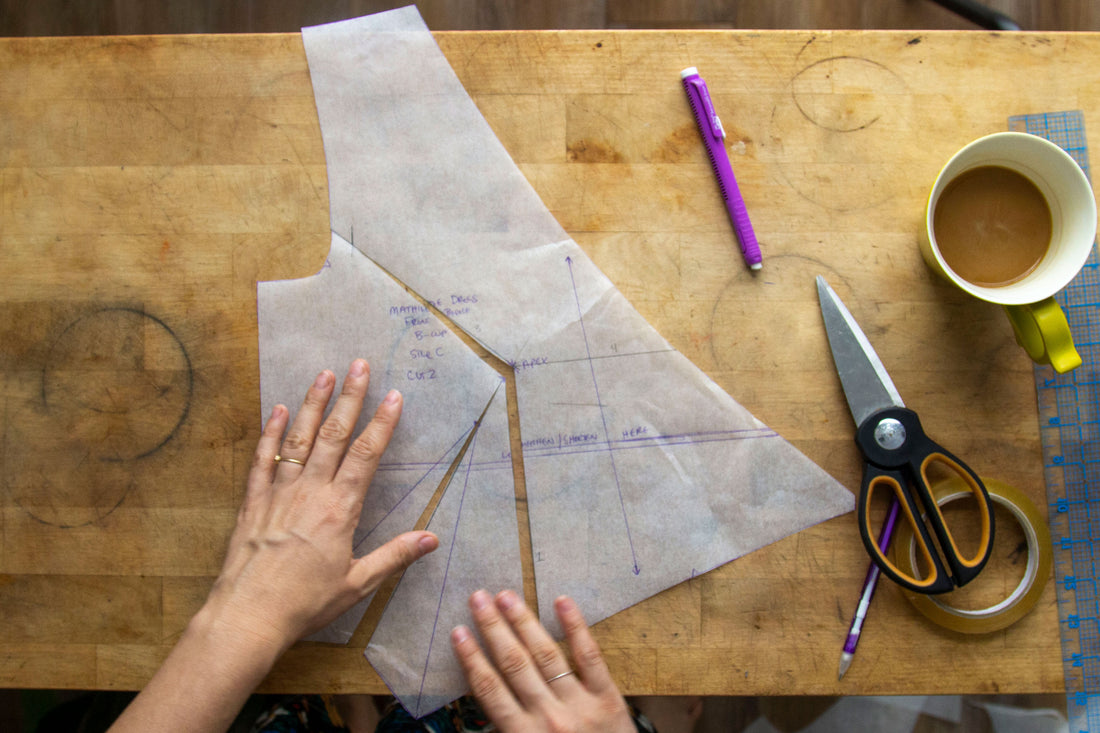
You will want to start by first tracing off your front bodice pattern along with all of the important markings on your pattern such as:- Grainline
- Darts
- Apex Point**
- Notches
- Lengthen/Shorten Line
- Size + View

** Not all patterns come with the Apex Point marked on the actual pattern. The general rule of thumb is that the apex point will be somewhere from ½” (1.3 cm) - 1.5” (3.8 cm) from the end of the dart point. When in doubt, you can always hold the paper pattern up to your body to determine where your apex point lies. If it is different from where your pattern darts are pointing and you need help adjusting the apex point, I’ve got a blog post for doing just that!
Next, you will draw lines onto your pattern piece. The lines you want to draw are as follows:
- From your Apex perpendicularly through your waist seam.
- Directly through the center of your French dart to your Apex.
- From your Apex point to your armhole (You want to draw your line roughly 1/3 of the way from the shoulder seam to prevent distortion in the armscye).
- From your Apex horizontally through the center front.

Now that all your lines are in place, let's get to cutting and hinging our pattern out! There are a few places we will be cutting. It's important NOT to cut through our entire pattern piece. We want to leave a smidgen of the pattern intact so that we can hinge the pieces around and not accidentally distort the outer pattern edges too much!
The first set of lines you will want to cut through are lines 1 + 3.

I forgot to mention, we need to mark out our seam allowance right at our armsyce where line 3 passes through. This is the point where we will stop cutting to create a hinge!

To create a little hinge in your pattern (which allows you to shift your pattern open [FBA] or closed [SBA]), snip from your armscye to -- not through -- the seam allowance mark you just made.

Next, cut line 2, starting from the center of your dart and ending right at the apex point. Be sure you don’t cut your piece completely off - you need to leave the tiniest bit of paper so that you are able to hinge your pattern, rather than having it come apart in puzzle-like pieces.


 See how I am able to lightly pull my pattern piece and it opens up, yet all the pieces are still intact? This is what we are going for! Don’t worry if you accidentally cut through your pieces (as I have done many times!) Simply tape your pieces back together at the “hinge” point, and try cutting it again. It gets easier with practice!
Now that your front bodice pieces are all prepped, it’s time to diverge into either performing an FBA or an SBA.
Full Bust Adjustment (FBA)
If you are performing a Small Bust adjustment, feel free to skip ahead to the next section.
For this next part, you will need some tape, scrap paper, a pen, and the measurement you plan to increase your pattern piece by. For me, that measurement will be 1” (2.5 cm), which would take my current B-Cup bodice up to a DD-Cup.
With your supplies in hand (and possibly a large cup of tea at the ready!), it’s time to get to adjusting!
Slide a scrap piece of paper under your bodice pattern and then gently pull the bottom edge of your pattern pieces until they start to spread apart.


I like to place my ruler right at my apex point so that when I am sliding my pattern out, I can stop as soon as it reaches the measurement I am aiming for. In this case, 1” (2.5 cm).
Go ahead and tape the apex side of your garment to your scrap piece of paper to help keep it from sliding all over the place. Don’t tape the dart side down just yet as we might need to take a look at some things first!
When performing an FBA, it is common to wind up with a new dart that becomes too wide compared to its length. When a dart is too wide for its respective length, this drastic change can cause the bust points to be rather… pointy. For some, this is a non-issue, but for many, avoiding a point at the end of our darts is paramount.
 EEEP! 5” is a bit too wide for a dart in my experience. Looks like this pattern will need an additional dart someplace else to offset any pointiness that would come from having a singular dart.

But what is the right width to length ratio for your dart?
Honestly, the answer to this question depends. It depends on your cup size, the location of the dart, the fabric you are using, and your own personal preferences. I wish that I had a sure fire answer that would work 100% for everyone, but I don’t. (If you know of a general guideline, feel free to share! A quick internet search yields next to nothing regarding the proper ratio to maintain.)
For myself, I go based on gut instinct for the most part. I’ve made a fair share of garments with darts that were too wide (including my own Amelie Dress while in testing!) and wound up with a dart point that was quite pointy. As my own personal rule, I try to keep all my bust darts less than 4” (10 cm) wide by 6” (15 cm) long.
When in doubt about your bust width to length ratio, the easiest solution is to simply transfer the excess width of your dart into a second dart which is exactly what we are going to do here (and why many patterns that cater to fuller busts have multiple darts drafted in - it’s all to help maintain that smooth fit over the bust!).
In order to add in an additional dart, you will first need to mark your new apex point on your pattern. With your ruler, mark the halfway point between your original dart point and your original apex point.

Then, with your ruler set perpendicularly to your side seam, draw a straight line from your apex point to your side seam.

This is where your new dart will live, along with the excess fullness that was originally transferred to your french dart when performing the FBA. If you would like your second dart to be transferred someplace else, feel free to check out How to Move Darts in a Pattern or Moving a French Dart.
Now it’s time to cut your new dart into existence!
 Remember to go to -- not through -- the point in which your paper splits (right before the apex). This will be our hinge point.

Slide your french dart closed so that you now reveal a small underarm dart.

Place a piece of scrap paper under your new underarm dart and go ahead and tape everything you currently see in front of you down to prevent anything from shifting out of place!

I know that was a LOT of work! You are nearly there, but now would probably be a great time to take a mini break. Feel free to stretch, take a quick walk around your neighborhood, or drink a cool glass of water! When you come back, we will finish this tutorial up by making one final adjustment and truing up your pattern!
Feeling refreshed? Then let’s dive back in and finish this alteration up!
The final step before truing your pattern is to shift the right bottom bit of your bodice down so that your waist lines line up again. This will also give ample room for your garment bodice to fall over your bust without riding up in the waist area.
To do this, cut completely through line 4.

Then shift your pattern piece down until the waist line is about even. Make sure that you keep your grainline in the same place as you move your pattern piece down (you want it to remain a straight line).

Tape your pattern piece in place.
Now come the finishing touches! You are going to go through and true up a few odds and ends as well as clean up your new underarm dart. I have listed the parts you need to true up below:
Your waist seam


Your front bodice seam

Your armscye


And finally, you need to draw out your new underarm dart. To do this, measure out a point approximately 1” (2.5 cm) from your apex point. This is your new dart point.

Next, connect your new dart point to the dart legs i.e. where you slashed and spread your paper on your side seam.

Finally, close your dart temporarily. Cut off the excess paper under your side seam and then open your dart back up.


Hooray! You now have a fully completed french dart bodice with an FBA perfectly suited to your body! It was a long process but I hope that you found it enjoyable and are excited to have a pattern that more closely fits you!

Small Bust Adjustment (SBA)
Performing an SBA is much simpler than performing an FBA as there aren’t as many steps required.
For this next part, you will need some tape, scrap paper, a pen, and the measurement you plan to increase your pattern piece by. For me, that measurement will be 1” (2.5 cm), which would take my current B-Cup bodice up to an A-Cup.
With your supplies in hand (and possibly a large cup of tea at the ready!), it’s time to get to adjusting!
Gently push your pattern pieces until they begin to slide together over your original apex point.


I like to place my ruler right at my apex point so that when I am pushing my pattern in, I can stop as soon as it reaches the measurement I am aiming for. In this case, 1” (2.5 cm).
Once you reach your measurement, go ahead and tape your dart closed as well as the pieces above your apex. Keep the bits below your apex un-taped as you will need to shift those pieces around a bit in just a minute.
Next, cut completely through line 4 as you are about to shift your pattern piece up so that the waist seam is even. This shift also helps to eliminate some excess fabric so that your bodice flows over your bust without any gaping.

Shift the bottom bit of your bodice upwards until your waist seams are lined up. Make sure you keep your grainline intact so that it remains as a continuous, unbroken line.


Awesome! You are nearly done! All you need to do to finish your SBA is to mark your new apex, redraw your dart, and true up your front opening + armsyce. Let’s start by marking your new apex point.
Grab your ruler and find the halfway point between where your old apex was and where your paper shifted.

Now on to drawing out your new dart! To do this, measure out a point approximately 1” (2.5 cm) from your apex point. This is your new dart point.

Next, connect your new dart point to the original dart legs.


Finally, close your dart temporarily. Cut off the excess paper under your waist seam and then open your dart back up.


The major bits are done and all you have to do now is true up your armscye….

…. and front opening!

Hooray! You now have a fully completed french dart bodice with an ABA perfectly suited to your body! I hope that you found the process enjoyable and are excited to have a pattern that more closely fits you!
