
If you have been following along in my journey for a good while, you will know that one of my first designs released under my brand, Untitled Thoughts, was one of my favorites! However, it was also one of the most flawed patterns I have ever designed.
But that's kind of to be expected, right? I jumped in to designing patterns knowing next-to-nothing about how the process all worked. I knew how to draft patterns; I knew how to custom fit garments to a variety of people; I knew how to photograph and write and illustrate. But I didn't know how to put all of those skills together in a way that would be really meaningful.
Yet I jumped right in anyway. Because I firmly believe that nothing I do will ever be perfect, and the worst thing that can happen with a pattern I design is that someone tells me something is wrong. When that happens, I have the opportunity to fix it and make it better with new skills I have learned along the way!
All of that to say, thank you to everyone who first purchased the original Matilda Pattern and gave me the courage to share my work with you. And thank you for being so patient with me as I updated the Matilda, transformed it into the Mathilde, and made it the best darn pattern it could be! (If you purchased this pattern way back when and would like an updated copy of the files, feel free to reach out to me!)
Shall we get started, then?
For this sewalong, I'll be doing the following:
1) Each day I will release a new sewalong step! In the past, this has been a bit sporadic, but I am now scheduling my posts to be released every day for the next week or so (depending on which view you are working with) at 12 PM EST. Hopefully this helps to know that each day something will be here waiting for you to dive in to!
2) I will be following my instruction booklet as closely as I can so that you can flit back and forth between this sewalong and the drawings in the booklet with as much ease as possible!
3) I will continue developing supplemental material for this pattern as I can! I have already finished a few of the posts directly linked in your instruction booklet. But if you wish to find ALL of the posts associated with the Mathilde, simply type Mathilde into the search bar at the top of the web page.
4) I am doing all of the garment versions simultaneously! I will include various techniques across all of the sewalongs, so feel free to skip around through each of them, picking up the pieces that are most beneficial to you in this process :)
Today, we are going to take on some prep work! And what does any good prep work start with? Supplies!
SUPPLIES NEEDED:

Check page 24 of your instruction booklet for my handy Materials Checklist
Before You Start!
There are a few things I'd like to note before we jump in to your project!
1) If you haven't already, I suggest washing your fabric! Nothing is worse than finishing a project and then having it ruined come laundry day. I can't tell you how much I've regretted not taking the time to wash my fabric before sewing it up. So many cute items are now basically child-sized because they have carelessly been tossed into the dryer and they were never pre-shrunk.
2) While you are waiting for your pretty fabric to wash & dry, I highly highly suggest sewing up a toile. That way, you can be 100% certain that the dress/ peplum will fit you EXACTLY how you envisioned before you cut out all the pieces in your pretty fabric.
Plus, you can work on some techniques throughout the process that may be tricky and find your favorite way of putting everything together! And since we all are shaped differently, any part of this garment might lay on us imperfectly. Might as well work out those kinks while the fabric is tumbling away in the dryer!
3) The seam allowance for this pattern is 1/2" (1.3 cm) unless otherwise noted!
4) Remember to be easy on yourself and take lots of breaks! Sewing is supposed to be fun, so if you feel yourself getting frustrated, take a deep breath, tell yourself nice things, and grab a sweet treat! That could mean taking a TV break, walking around outside, grabbing a special cup of coffee, or opting for a quick nap.
Let's Get Started!
I always like to get all the little prep bits out of the way first. That way, when the major sewing begins, I don’t have to stop to change a bunch of settings on my machine- I can just dive right in!
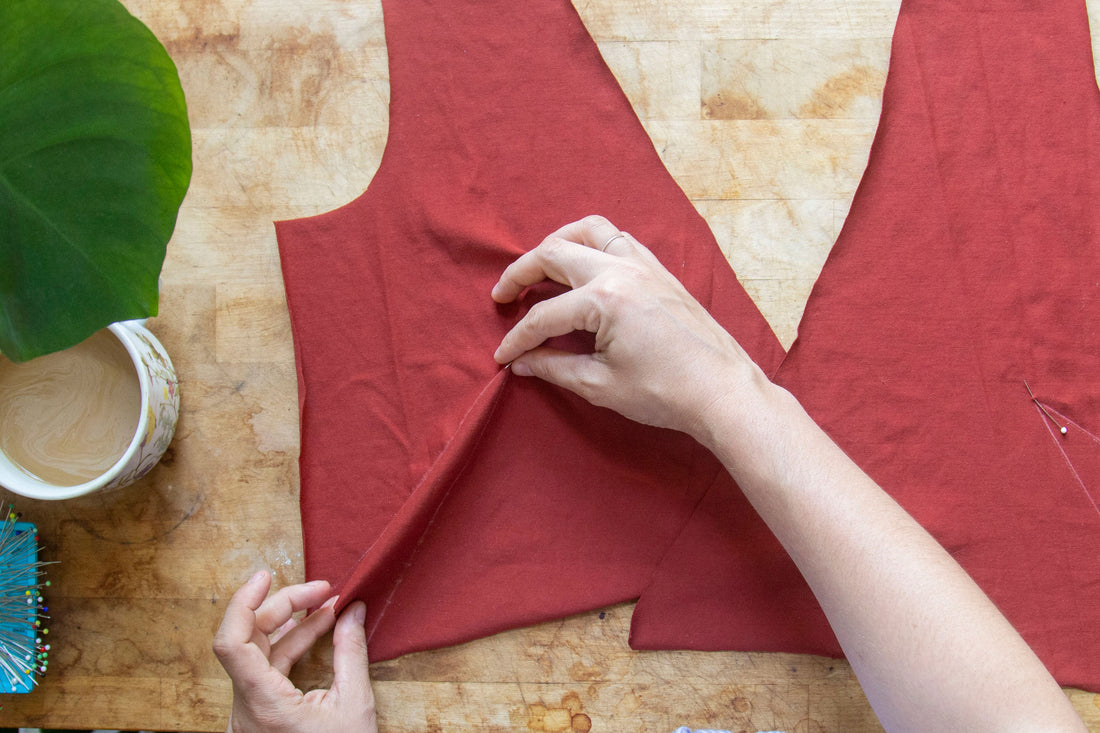
Before I sew my darts, I like to mark out my darts with some tailors chalk or another marking medium safe for fabric. It makes the entire process of sewing a straight line on a angle sooooo much easier than eyeballing it.


Once you've got your darts marked out, sew your front bodice darts by pinching the right sides of your fabric together, matching up the dart legs and sewing to a tapered point, creating a triangle using a straight stitch. Do not backstitch at the end points.


Tie off the ends of your threads at the dart points, and press your darts down towards the waist.


Baste in place.


Note: If you are sewing the DD-Cup bodice, you will have an additional set of bust darts to complete!
Grab your back bodice and, with Right Sides Together (RST), attach your front bodice pieces to your back bodice at the shoulder seams using a zig-zag stitch.


Optional: If you want to add more structure to your shoulder seams (or you simply have a really stretchy fabric you’d like to stabilize) you can add a strip of twill tape or clear elastic to your shoulder seam right along the seam allowance!

Trim your seams and press them to the back.


 You can actually press your seams any way you please. I pressed mine towards the front as my twill tape scrap was a bit too thick to try and press over.


 You can actually press your seams any way you please. I pressed mine towards the front as my twill tape scrap was a bit too thick to try and press over.
Awesome! Now that your prep is out of the way, and your shoulder seams have been addressed, it's time to get to really sewing this magical garment up! I will meet you back here tomorrow for Part 2 - Attaching the Sleeves.
1 comment
On the pattern, both of the “Front Bodice” pieces say “CUT 2”. So for each I cut 2 copies – in total I have 4 front bodice pieces. (One bodice pattern has 2 darts and the other has 1 dart.)
But in the PDF instructions and here on the web page, I only see 2 total bodice pieces.
What am I doing wrong? I’m a beginner, obviously.