

Today is the final day of the Fleur Sewalong! Once you have made it through this post, you should have an incredible Fleur ready to be worn all day, everyday!
We will be starting at the bottom of page 51 with our buttonholes!
Try on your skirt (eep you are almost there!) and pin along the markings for the buttonholes. You can stick with what I recommend as far as button size and placement go, or you can switch it up and add more or less!
The intention for this skirt was to have the following:
• One 3/4” (1.9 cm) button on the front left & front
right waistband
• Two 1/2” (1.3 cm) buttons on both the right & left
skirt placket
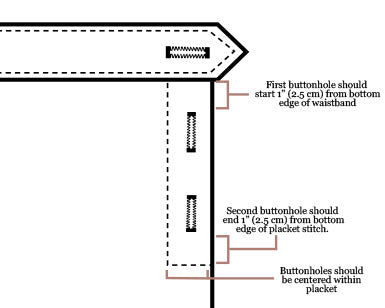
For the skirt placket, feel free to use the diagram below when determining where to place your buttons & buttonholes.


When actually sewing the buttonholes, follow your sewing machine’s instructions as each machine is slightly different.

Be sure to test on a swatch of the fabric you are using before sewing on your final garment.

Once your buttonholes are complete, use a button hole chisel, xacto knife, or seam ripper to carefully cut them open.
When using a seam ripper or xacto knife, I like to put a pin at the top edge of my buttonhole- that way, if my hand slips, I don’t accidentally ruin my beautiful new buttonhole. Something I have done more often than I care to admit!


You can now sew on your buttons. I like to mark my button placement by laying the buttonhole piece over the button placket then marking through them with chalk.


The other, easier option is to totally nix buttons all together and instead sew in snaps! They are a great alternative if you don’t have the option of sewing buttonholes!
And finally, we come to our last step — Hemming the skirt!
Press up the bottom edge of your skirt by 1/2” (1.3 cm) then another 1/2” (1.3 cm).


At this point, you may notice that right at your side seams, there is quite a bit of bulk coming from the seam allowances being folded on top of itself. If you don't like this bulk, or find that it is difficult to sew over, you can reduce this bulk in the same way that we did for the pocket corners!
Unfold your hem and cut just inside of the ironed edges. Then refold your hem back into place, pin it, and sew along the upper folded edge.


YAY!! You have officially completed your Fleur
Pinafore! I think it is time to show the world
how awesome your new creation is! Feel free to tag me @untitledthoughts on IG or use the hashtag #UTFleur #UTFleurPinafore so that we can all see your wonderful new creation :)
