
Cutting knits can be a pain in the butt sometimes. Especially when working with really luxurious knits. The softer and drapy-er your knit, the greater chance you are going to potentially struggle with getting it cut out without throwing your scissors across the room. Speaking 100% from personal experience.
It's just like with woven fabrics- the prettier and more fluid the fabric, the harder it is to work with. That is...if you are using the same methods as when working with less fluid fabrics.
There are ways to cut all sorts of fabrics without giving yourself a massive headache, and knits are no different. So, if you are working with a particularly stubborn knit, buckle in. Hopefully some of these tips will help the next time you are feeling a bit defeated by your fabric.
First off, you should definitely be pre-washing your fabric, and by your fabric, I mean ALL of your fabric- not just the knit variety.

Trust me, by pre-washing, you will save yourself a lot of heartache from accidental tosses in the wash where your beautiful #MeMade garments come out child size- great if you happen to have children, but also saddening if you really liked that particular garment.
I also highly recommend pre-washing your fabric not in a way that you personally plan to wash your garments in the future. Oh no, I recommend washing your garments in the same manner that your spouse/ partner/ roomie/ etc... might do the laundry.
I trust that you would wash your clothing the same way each time, but I can't tell you how many times I've had something tossed in the dryer that should have been hung up to dry, or was washed on high heat that needed a gentle cool cycle and wound up shrunken, pilled, etc etc... by my darling partner. He means well, but how is he to keep track of all my specialty clothes that require so much love and attention?
Now I pre-wash everything the way he might one day wash it (or even how I have mistakenly washed things while in a hurry)- in hot water and through the heat of the dryer. That way it's nice and preshrunk and no heartache ever has to occur in the future.
Alrighty, so now that your fabric has been pre-washed, it's time to iron. I know neither of these tasks is fun, but both are super helpful, especially if you are working with a rolly-polly jersey that doesn't want to lay flat. Spend some time with an iron and it's steam (if possible) to smooth those wrinkles out and iron those tight curls as flat as they will go.

If you are able to, try to keep your fabric from falling over the sides of the ironing board as you tackle this- as you iron, the weight of the fabric spilling over the sides can cause the fabric to stretch and warp in weird ways.
Once you have your pre-washed, freshly ironed fabric, you'll want to bring it over to your cutting space. If you have a long piece of fabric, cutting on the floor tends to be the best as you can adjust the fabric much more easily than on a too-short table. If you have a super long table, I am low-key envious and hope you'll invite me to your sewing studio in the future!
Having worked for the past few years at a fabric shop, I can tell you that cutting knit fabrics straight on the cross grain is probably the most challenging thing ever. It's unlikely to happen 99.9% of the time, so when laying your fabric on the fold, please don't be alarmed if the cut edges don't line up perfectly.

In fact, if they DO line up perfectly and your selvedge is matching perfectly as well, you might want to go buy a lotto ticket or something because the sewing gods are definitely hanging around your corner!
Just like with woven fabrics, the most important thing to match up are your selvedge edges. With rolly-polly jerseys, this can be a challenge (ugh). What I have found the most helpful is to tediously unroll the selvedge edges as I work my way down the fabric and pin them together so that they no longer roll.

This not only keeps my fabric super flat, it also usually gives me a few more inches of fabric to play with which is always a plus!
While lining up the selvedge edges, you also want to make sure that your folded edge is nice and flat without a twist in sight. If your fabric looks like this....

... you are off grain and should move your selvedge edge up or down until the twists disappear.

"But what if I am working with a knit that lost it's selvedge edge," you might be wondering.
There is still hope in finding the grain, though it is a bit more tedious.
To find the grain, you will literally have to locate the grain line in the fabric. This might require getting up close and personal with your fabric if the stitches are tiny, perhaps even grabbing a magnifying glass (cuz we all have one of those lying around, amirite?).
Once the grain line is located, you'll want to need to pin every few inches or so through the fabric's grain.

Once you have gone through and pinned a sufficient length, you can fold your fabric on the pinned grain line and continue on to the cutting phase.


I have also used this technique when working with a book fold instead of the traditional halfway fold.
 This is a book fold- perfect for patterns that require very little yardage or knits that happen to be extra wide! Also, I know this looks off grain, but that is actually a quirk of many heathered fabrics- the lines all tend to go at an angle!
 This is a book fold- perfect for patterns that require very little yardage or knits that happen to be extra wide! Also, I know this looks off grain, but that is actually a quirk of many heathered fabrics- the lines all tend to go at an angle!
Our last step through this epic tale that is cutting finnicky knit fabric: Cutting.
I personally have found that when it comes to cutting knit fabrics, it's just easier to use a rotary cutter, mat, and some pattern weights.

You don't even need fancy pattern weights like you might find at a sewing shop or haberdashery. You can get by easily using soup cans, jars of buttons, small tiles (like I use, leftover from our bathroom remodel!), small books... basically anything with decent weight and a compact size will work well as a pattern weight!

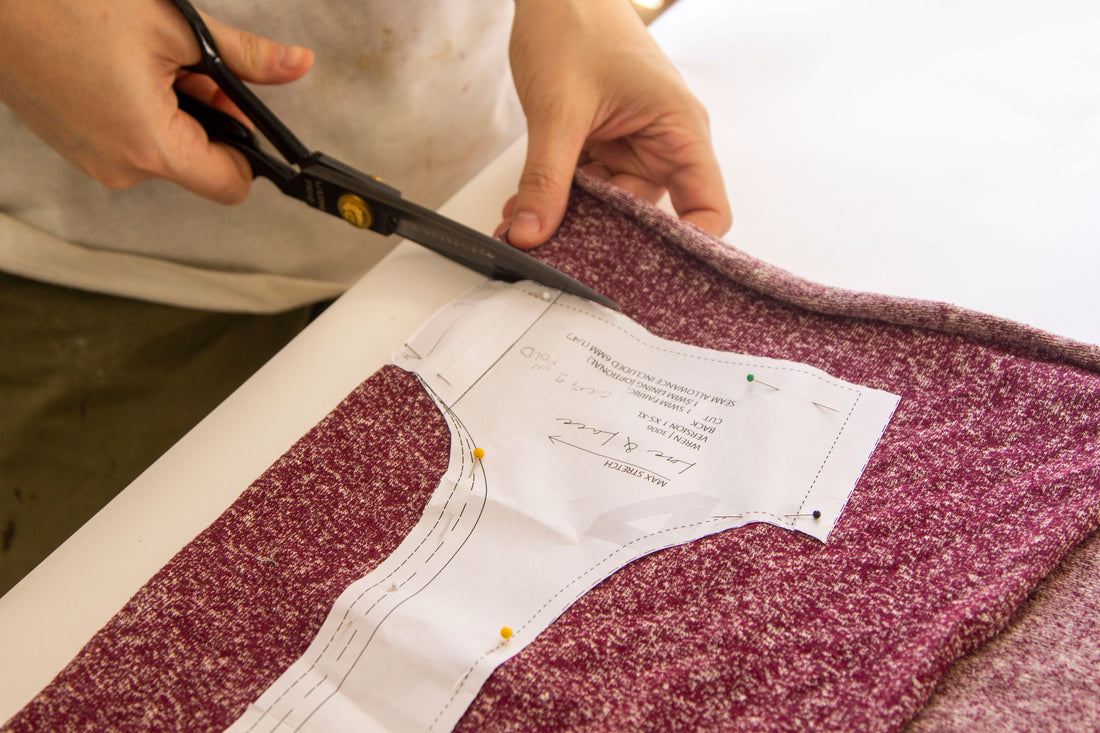
However, if you don't own a rotary cutter or aren't ready to use one just yet, you can cut your knits with scissors. Simply pin your pattern to your knit fabric and cut around the pattern edges, just as you would a woven fabric.

Take care not to lift your fabric too much (if at all) when pinning/ cutting as this can cause the fabric to shift off grain.
Last but not least, you will want to transfer all of your pattern markings onto your fabric!
For notches, you can either draw those on with a marking tool (ideal) or you can snip them with your scissors, but you want to make sure that your snip is less than your seam allowance. Generally, snipping the tiniest snip you could possibly snip is the best- if you snip too large, you may wind up with a hole where you don't want it later on.
For all other markings, using a marking tool or pins/ safety pins to indicate a pattern mark is best.
Congrats! If you made it all the way through this post I hope that these tips have inspired you to tackle any fears or doubts or reservations you might have with working with knits. Even though it seems like a lot of prep work, I promise it it worth all the extra care. You will know that you set up your project for success and that it will be well fitting and last much longer than if you hadn't taken the time to go through all this tediousness.
If you have any tips or tricks for cutting with knits that I accidentally forgot to mention (or just don't know about!) feel free to drop your insights into the comment section below, and as always, Bonne Couture!
4 comments
Thanks for your post and PICTURES… I haven’t worked with jersey knit for some time and I am struggling to get to lay flat .. I will keep tweaking the fold until it is flat … your post gave me the confidence that I am heading in the right direction! Thank you
Is there any way to get creases out of fabric if you don’t have an iron? Additionally, how do you prevent creases while you’re pinning the pattern in place?
Ohhh that’s such a great tip, Janice! I have never tried that but it makes so much sense! I will have to put a little reminder to myself for my next knit project :D
I find putting paper under knits or any slippery fabric, will help keep fabric easier to cut. You cut through both paper and fabric. If you don’t like to cut through paper with your scissors, may be use interfacing.