

When I first set about making the Fleur Pinafore, I wanted it to be the ultimate gardening garment! I spend loads of time outside in the garden, and one of the things I quickly realized is that I might be headed outside to do just one little thing, but I usually wind up staying out tackling loads of other little things.
One of the things I am most guilty of doing is harvesting a bunch of little things without having any real place to put them. That's why the Fleur comes equipped with large patch pockets! But even those can fill up quickly with berries and carrots and flowers, oh my! What is a gardener to do?
Cue the Gathering Skirt Hack.
I saw an image for a gathering skirt of sorts someplace on Pinterest, and the idea got stuck in my head. I will admit that this first attempt is not without its flaws. Actually, I only think there is one thing I would do differently if I were to make this all over again and that would be to lengthen the skirt past the knee.


When I purchased this fabric from Chateau Sew & Sew (non-affiliate link), I didn't know I would be doing this pattern hack, so I only got enough for the original pattern pieces. Whoops! Let's just say I have to be careful about how high I can pull the pouch up if I am not wearing shorts underneath.
However, even with my error in length, this skirt works wonders at adding valuable space for me to gather items when I am out and about in the garden! On this day alone I believe I harvested blackberries in one pocket, crimson clover in the pouch, and held my gardening tools in the second pocket. Pretty amazing, right?


Let's get started!
There luckily aren't many changes that you need to make to achieve this hack! The one and only pattern piece change necessary is lengthening the skirt your desired amount.
Like I said above, I would probably lengthen my skirt to be just below the knee if I were to do this pattern all over again! So maybe I would add an additional 5-7" (12.5 - 18 cm) in length to the skirt pieces.

The only other changes you need to make are in the addition of 3 more cuts of fabric : 2 skirt ties and 1 skirt loop.
The skirt ties should each measure out to be 2" (5 cm) x (the width of your skirt front), and the skirt loop should be 2" (5 cm) x ~7" (18 cm). The loop will wind up being too long, but that's ok as it's easier to turn and trim to the right size later on!

Once you have your skirt pattern pieces adjust and your additional pieces cut out, we can dive right in to sewing!
At the same time as you would prep your straps, you can go ahead and prep your skirt ties and loop pieces. Fold each piece in half lengthwise (like a hot dog!) and pin along the long, raw edge.


Using a 1/2" (1.3 cm) seam allowance, Sew along the long, raw that you just pinned leaving both of the shorter edges open so that you can easily turn out your straps.
Trim your seams in half to reduce bulk.

Next, using a safety pin, you are going to turn out your straps. Below I have demonstrated how to do so with the smaller of the 3 straps:

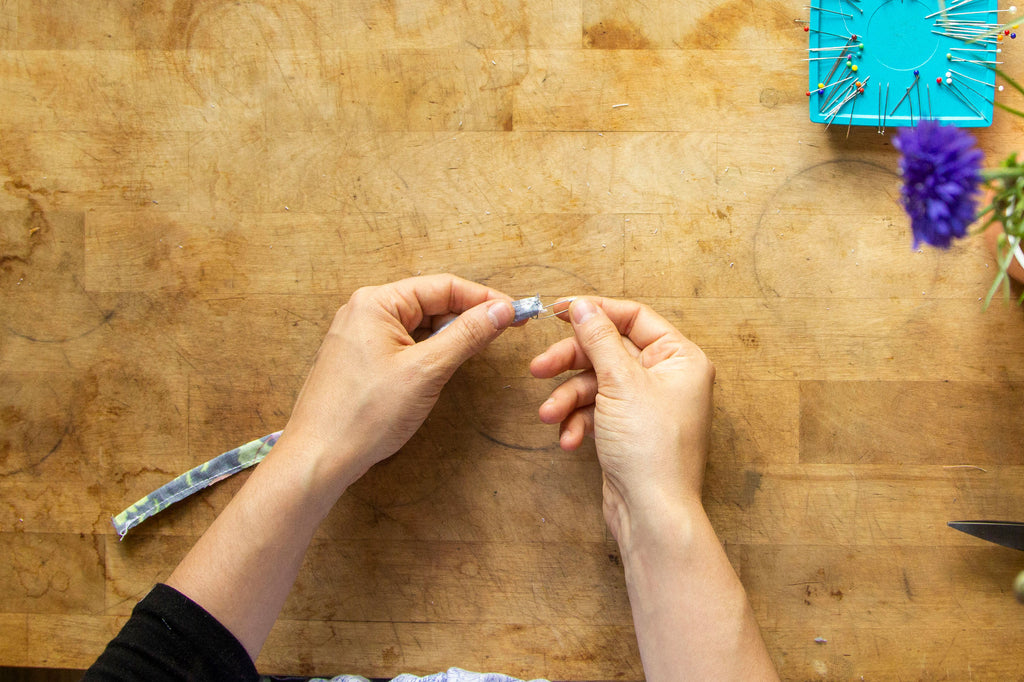

 I am slowly snaking the safety pin through the tube until it pops out the other side.


 I am slowly snaking the safety pin through the tube until it pops out the other side.

Once you have repeated these steps and all your ties are right side out, go ahead and press them flat.

Before you begin sewing your pinafore together, you will need to attach your skirt loop to the front waistband pattern piece. This loop is what the ties are pulled through to create the gathering pouch of the skirt.

Start by cutting your skirt loop piece down to ~3-4" (7.5-10 cm) in length.

Then, take that piece and create a U-shape and pin it to the bottom edge of your front waistband piece at the Center Front point (marked by a notch on your pattern piece)!


Baste your new loop into place, making sure that the U-shape is facing towards the inside of the waistband piece.

You can now go ahead and sew your entire pinafore together and meet me back here when you are ready to complete your hem! There are just a few minor tweaks needed to set your hem up for the skirt ties.
Before hemming your skirt, you will need to create a place for your skirt ties to actually exit so that they can be pulled like a drawstring, thus creating the gathering pouch.
The easiest solution I found was to add button holes to the skirt hem before actually hemming the skirt up. If you would like the ties to wind up on the inside of your garment, you will begin by measuring up 1" (2.5 cm) from the raw edge of the skirt. If you would like the ties to wind up on the outside of your garment (like mine!), you will begin by measuring up 1.5" (3.8 cm) from the raw edge of the skirt.

Next, mark a dot at least 1/2"- 3/4" (1.3 - 2 cm) from the center front portion of your skirt at the height in which you have chosen. So for me, I would mark a dot on either side of the CF of my skirt that was 1/2" from the CF and 1.5" from the bottom edge.


With the start of your buttonholes marked, it's time to actually create some buttonholes! Feel free to add some interfacing to your garment right behind your intended buttonholes. Then, sew them on up! The length of your buttonholes doesn't need to be too large- I made mine the same length required to fit a 1/2" (1.3 cm) button through.

You will definitely want to open your buttonholes before sewing your hem into place. I like to use a pin set at one end of my buttonholes and then a seam ripper to open them up, but you can use whatever tools you might have at your disposal (Xacto knife, buttonhole chisel, etc..)

And now it is time to hem your skirt! Just as I state in the instructions of the Fleur, you are going to press your hem up by 1/2" (1.3 cm)....


And then again by another 1/2" (1.3 cm) making sure that your button hole are not getting caught up in the line of stitching or the bottom fold of your hem!


When you go to sew your hem, you will want to make sure that you are leaving a little opening on both sides of your skirt so that you can thread your ties through the hem and out the buttonholes you created. I suggest leaving this little opening right along the side seams, that way you can tack the ties directly to the skirt right at the seam allowance.

Once you have your hem all sewn up, it's time to thread your ties through your little opening and out the buttonhole. Fashion as safety pin to one end of one of your skirt ties and slide it through the opening you left at the side seam...


.. and out through the buttonhole.

Turning back to the inside of your skirt, tuck the last bit of your skirt tie into the hem and tack it into place before sewing the little opening closed. I was able to sew a few stitches into the seam allowance so that you can't see where the ties are tacked from the right side of the garment.


Repeat these last few steps with the second tie on the other side of your skirt hem.
And finally, we come to our very last step: Tying off the raw ends of the skirt ties. This not only helps to keep the skirt tie from fraying, but it also will help to prevent your ties from accidentally getting sucked back up into the hem, forever to be lost.


 Get that knot nice and tight! We don't want it to unravel!


 Get that knot nice and tight! We don't want it to unravel!
 And snip it off using your favorite pair of pinking shears to help keep the edges from fraying further (unless you like a frayed edge that is!). I love using my LDH scissors for little steps such as this (affiliate link).
 And snip it off using your favorite pair of pinking shears to help keep the edges from fraying further (unless you like a frayed edge that is!). I love using my
Ta-da!! You have successfully created a gathering skirt for your Fleur Pinafore! How awesome does that feel? Now all you need to do is run out and start harvesting your favorite goodies from the garden :)
I'd love to see your own take on this, or any other Fleur Pinafore hack! Feel free to leave me a comment with how you've spiced up your Fleur or tag me on IG with your make! You can tag me at @untitledthoughts or by using #UTFleurHack

