
 Understitching has forever seemed to be one of those elusive, tricky, hard to explain sewing terms. Whenever I am teaching a class and attempt to show how to understitch a garment, my words always seem to fall short.
It's never the student's fault, I just can't seem to show what it is that I mean when I say "This is how you understitch and why.."
So, I figured it was time for a photographed tutorial, because a picture is so much better than words sometimes!
Let's first define understitching. Understitching is stitching done on the wrong side of the garment with the purpose of keeping the seam allowances on the wrong side and supporting the seam. Typically, you would understitch facings or linings to help keep them from poking out from behind your main fabric while wearing your garment!
I decided to make a mini-bodice to practice my understitching techniques on- this ensures that if I make a mistake, I can simply toss the project into my remnants bin without worrying about ruining a full garment.

First, you will want to gather your materials. For me, that meant grabbing my mini bodice and her mini facing companion.
Before attaching the facing to the bodice piece, I prepped my facing with interfacing. Generally, a facing requires a bit of stability so that the neckline doesn't warp over time!
Next, you'll want to sew along the neckline of the bodice and the facing pieces, with right sides together.

Clip all along your curve (if there is one) to help allow the seam allowance to spread once it has been turned to the right side.

Next, you will want to press your facing away from your garment along with the seam allowance. This is important- we want to make sure that your seam allowance AND your facing are going in the same direction as this is what we will be sewing together!


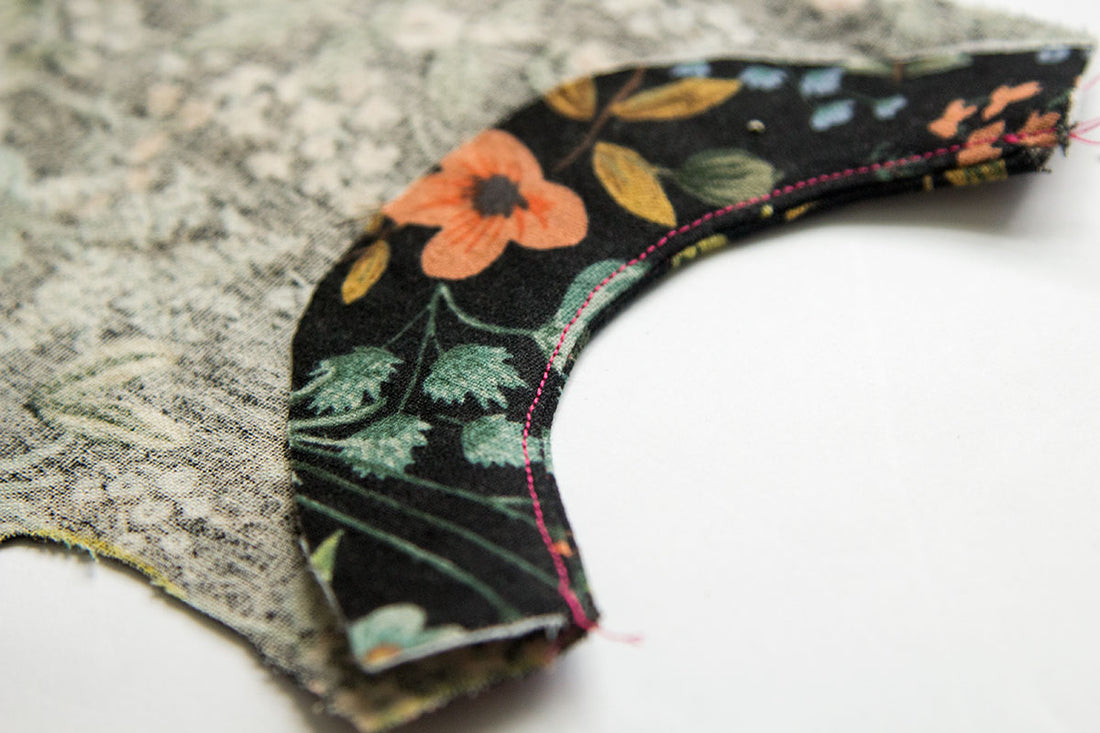
And now, we sew! I was a total doofus and forgot to snag a photo of this particular piece being understitched, so I will drop in an image of another garment I had to understitch that I DID get a photo of!

In the image above, I am stitching about 1/8" / 0.3 cm away from the actual seam that joins the facing to the bodice front. As you are stitching, you want to make sure that you are catching all of your seam allowance under the facing. Below is what the underside of your facing should look like:

Give it one final press now with the wrong sides of your facing and bodice touching and voila! You have successfully completed your first round of understitching!


2 comments
Hi Sally!
Usually, if the fabric is curling towards the main fabric it is because it does need to either be tacked or understitched. I like understitching the best because it provides the cleanest finish and it isn’t seen at all from the front! And thank you — I am so glad you liked the muslin suggestion :)
PS – I have sent you and email as well since I failed to respond to your thoughtful comment in a timely manner (My apologies!)
Hello!
Thank you for your tutorials! I’m in a facing pickle…what causes the facing to curl toward the main fabric? Is it always necessary to tack down the facing? I have not consistently used interfacing, as you suggest.
Your thought are appreciated!!
~Sally
p.s. Your suggestion to use muslin is genius!