As many of you know, all of my knit patterns include some form of darts. Even though many conventional knit patterns do no include darts because of the stretchy nature of knitted fabrics, I personally find that I prefer the fit of knit garments with a dart, especially around the bust area!
I have also found that many sewists who have a larger cup size benefit from a bust dart in their knit garments because it eliminates that excess fabric pooling that tends to happen right under the armpit.
But I understand that sewing a dart in a knit garment comes down to personal preference, and not everyone wishes to have a dart in their garment. Heck, sometimes the fabric causes the dart to look really weird because of print placement! That's why I have put together this mini tutorial on how to remove darts in a knit pattern.
For this tutorial, I will be demonstrating how to remove a dart from a knit pattern using the Sandrine Tank as my example, but feel free to try this method out on whatever garment you might currently be working on!
Let's get started!
The very first thing you will want to do is to trace off your pattern piece that contains the dart you wish to remove. Be sure to transfer all of the necessary markings from your paper pattern onto your traced version.
This next part requires you to have marked the apex of your pattern as well. For the Sandrine, that is already marked on the pattern itself and simply needs to be transferred. If you are working with a pattern that does not have the apex marked you will need to find this point. Generally, the apex is located roughly 1/2" to 1" (1.3 - 2.5 cm) away from the end of your bust point.
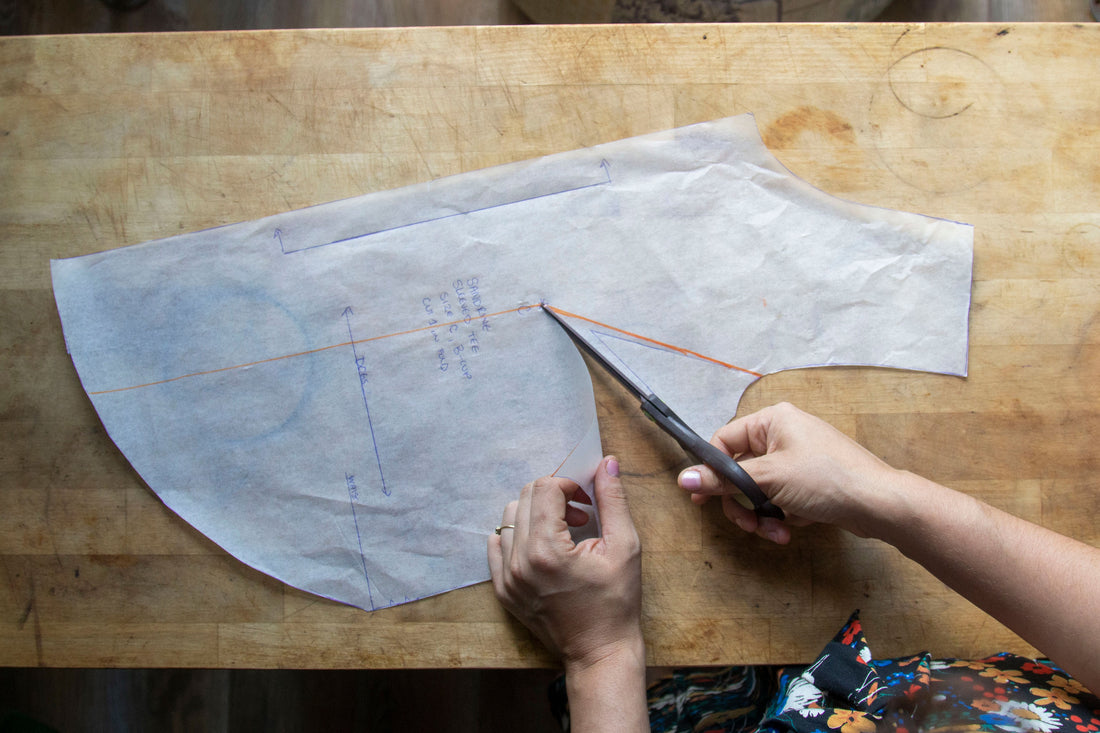
Once you have your apex marked, draw a ling from one dart leg to your apex, then repeat with your other dart leg.

Next, draw a line from the apex to the hem of your pattern piece. When removing a dart, the excess volume needs to be transferred somewhere, and generally the easiest place to do this is through the hem.

Once all of your lines have been drawn, it is time to start slashing and spreading your pattern! Start by cutting one of your dart legs to, not through, your apex point.

You'll do the same thing with regards to cutting from your hem up to, not through, your apex point. You want to have just enough of your paper still intact so that you can pivot your pattern without it coming apart into two separate pieces.

Now, it is time to pivot your dart closed. Simply slide your pattern until one dart leg meets the other, then tape your dart shut.

You may notice that your armhole (or wherever your current dart is located!) looks a bit wonky with excess dart legs sticking out. You should true this part of your pattern, which is to say you should smooth your pattern out so that it looks correct. For me, that meant connecting the top of my armhole curve to the bottom of my armhole curve just beyond the two original dart leg points and then cutting off the excess pattern bits.


Now I am sure you have noticed that you have a huge swingy shape to your pattern piece and depending on your project, this may or may not work. For the Sandrine, keeping this extra swing provides more drape to the pattern which is awesome especially if you enjoy a very loose and casual style OR if you happen to have a large waist to hip ratio and are hoping to balance out your garment's proportions with a little extra drape.


 You can stop here if you don't mind the extra swing this adjustment creates in your pattern.


 You can stop here if you don't mind the extra swing this adjustment creates in your pattern.
However, if you don't particularly like that extra swing, or it feels like a bit too much (which is more likely the case with a larger cup size as there is more fullness to distribute through the hem), I recently found a way to eliminate some of the excess you might see.
I had never seen this sort of thing done before, but after working on this pattern and trying this particular method out for this tutorial, it looks to be a wonderful solution to eliminating darts without adding more fabric to an pattern!
This particular method comes from Maria Denmark's blog! Basically, what we are doing is eliminating the new "dart" we added to the waist and hem of our pattern. To do this, start by drawing a line from one of your new "dart" legs to a point on your armhole near the side seam of your garment.
Repeat with the second "dart" leg, ending at that same point in the armhole. You are essentially creating a new "dart" that will then be closed to eliminate all that excess swing!

Cut from the hem of the new "dart" leg that you drew that is closest to your side seam to, not through, your armhole point.


Now, just as you did with your original dart, pivot your cut dart leg until it meets your uncut dart leg. Tape your dart shut.


I am sure you have noticed that your hem looks SUPER weird. Almost like a step ladder which is cool, but maybe not the look you were going for. To correct this, you can use a french curve to connect your side seam to your hem. Or you can be like me and eyeball it! Whatever works best for you, you just want to make sure that your side seam end point is trued into your hem end point.
I had to add a bit of scrap tracing paper to my pattern piece to make this part work.


And voila! Once you have drawn out your new hem and cut away any excess material, you should have a really lovely pattern piece ready to be cut out sans dart!

Do you have a special way of removing darts from knit garments? If so, I'd love to hear! It was so much fun learning this new trick from Maria's blog and I am sure there are tons of other ways to achieve similar results! Isn't that part of the fun of sewing?
4 comments
Hi Varinder!
I will send you a direct email message to ensure my answer arrives to you! :)
Hi Anthonia!
Oh yes! I cannot wait to see how your striped version turns out!
Hey. My question is this dart elimination ? And what are the different methods of dart elimination ? Please reply
Thanks for this excellent tutorial. I’m going to try it on stripey cotton-viscose jersey because I don’t want the stripes disturbed.
Best wishes.